Recompilar OpenSSL 1.1 & NGINX 1.25 para TLS 1.3 (CentOS 7), siguiendo el escenario donde ya ha instalado en el servidor o versión más antigua openssl asociado con el servicio nginx.
Más concretamente, para poder activar OpenSSL 1.1.1t para el servicio NGINX, que se ejecuta con una versión anterior. OpenSSL 1.0.2k.
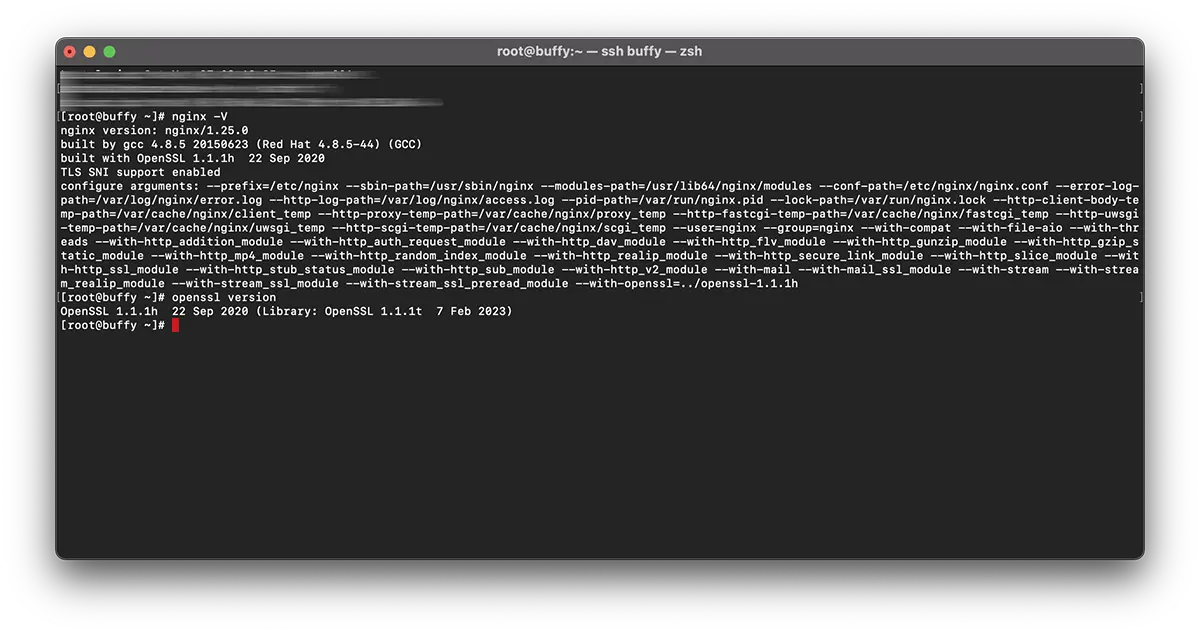
# nginx -V
nginx version: nginx/1.25.0
built by gcc 4.8.5 20150623 (Red Hat 4.8.5-44) (GCC)
built with OpenSSL 1.0.2k-fips  26 Jan 2017
TLS SNI support enabled
# openssl version -a
OpenSSL 1.1.1t 7 Feb 2023Esto significa que hay dos versiones diferentes de OpenSSL. Una versión instalada en el sistema por “yum"(1.0.2k-fips) y una versión OpenSSL instalado por compilación manual (openssl 1.1.1t).
Clásicamente, la mayoría recomienda reinstalar 'OpenSSL' a nivel de servidor. Esto implicaría ejecutar el comando: yum remove openssl. Pero hay un gran problema aquí. Con la desinstalación de la versión anterior OpenSSL, es posible que también deba desinstalar algunas aplicaciones dependientes. Como: nginx, MariaDB-server, cerbotMás muchos otros.
Una solución más simple es recompilar openssl 1.1 & nginx 1.25 para TLS 1.3.
Contenido
Tutorial de recompilación OpenSSL 1.1 & NGINX 1.25 para TLS 1.3 (CentOS 7)
En mi ejemplo, la recopilación es para nginx/1.25.0 & OpenSSL 1.1.1h usando librerías OpenSSL 1.1.1t.
Vuelva a compilar NGINX.
1. Cree el archivo: nginx-with-tls13-compile.sh
sudo nano nginx-with-tls13-compile.shdonde agregas el script:
#!/bin/bash

## nginx
NGINX=nginx-1.25.0.tar.gz

if [ ! -f "${NGINX}" ];then
    wget https://nginx.org/download/${NGINX}
fi

ND=$(basename $NGINX .tar.gz)
if [ ! -d "${ND}" ];then
    tar zxvf ${NGINX}
fi

cd ${ND}

## pre require package
## yum install gcc pcre-devel zlib-devel

./configure --prefix=/etc/nginx \
    --sbin-path=/usr/sbin/nginx \
    --modules-path=/usr/lib64/nginx/modules  \
    --conf-path=/etc/nginx/nginx.conf \
    --error-log-path=/var/log/nginx/error.log \
    --http-log-path=/var/log/nginx/access.log \
    --pid-path=/var/run/nginx.pid \
    --lock-path=/var/run/nginx.lock \
    --http-client-body-temp-path=/var/cache/nginx/client_temp \
    --http-proxy-temp-path=/var/cache/nginx/proxy_temp \
    --http-fastcgi-temp-path=/var/cache/nginx/fastcgi_temp \
    --http-uwsgi-temp-path=/var/cache/nginx/uwsgi_temp \
    --http-scgi-temp-path=/var/cache/nginx/scgi_temp \
    --user=nginx \
    --group=nginx \
    --with-compat \
    --with-file-aio \
    --with-threads \
    --with-http_addition_module \
    --with-http_auth_request_module \
    --with-http_dav_module \
    --with-http_flv_module \
    --with-http_gunzip_module \
    --with-http_gzip_static_module \
    --with-http_mp4_module \
    --with-http_random_index_module \
    --with-http_realip_module \
    --with-http_secure_link_module \
    --with-http_slice_module \
    --with-http_ssl_module \
    --with-http_stub_status_module \
    --with-http_sub_module \
    --with-http_v2_module \
    --with-mail \
    --with-mail_ssl_module \
    --with-stream \
    --with-stream_realip_module \
    --with-stream_ssl_module \
    --with-stream_ssl_preread_module \
    --with-openssl=../$(basename $OPENSSL .tar.gz)

make

sudo make install

nginx -V
Guarde el nuevo archivo.
2. Cree el nuevo archivo ejecutable:
chmod +x nginx-with-tls13-compile.shVolver a escribir nginx.service
3. Haz una copia de seguridad de nginx.service.
cat /lib/systemd/system/nginx.service > /srv/nginx_service.txt(puede elegir cualquier ruta que desee para nginx_service.txt)
4. Crea el archivo para el servicio. nginx: nginx.service
sudo nano nginx.service5. En el archivo el nuevo archivo nginx.service agrega las lineas:
##  /lib/systemd/system/nginx.service

[Unit]
Description=The NGINX HTTP and reverse proxy server
After=syslog.target network.target remote-fs.target nss-lookup.target

[Service]
Type=forking
PIDFile=/run/nginx.pid
ExecStartPre=/usr/sbin/nginx -t
ExecStart=/usr/sbin/nginx
ExecReload=/usr/sbin/nginx -s reload
ExecStop=/bin/kill -s QUIT $MAINPID
PrivateTmp=true

[Install]
WantedBy=multi-user.target
6. Copie el archivo a 'daemon".
sudo cp nginx.service /lib/systemd/system/nginx.service7. Una vez copiado el archivo, actualice los permisos del archivo con el comando:
sudo chmod 644 /lib/systemd/system/nginx.service8. Vuelva a cargar la configuración systemd para tener en cuenta los cambios usando el comando:
sudo systemctl daemon-reload9. Reiniciar ngnix.
sudo systemctl restart nginxRecompilar OpenSSL / NGINX para TLS 1.3
10. En la misma carpeta donde tienes los archivos nginx-with-tls13-compile.sh şi nginx.service, crea un nuevo archivo: openssl-1.1-compile.sh.
sudo nano openssl-1.1-compile.shAgregue el guión:
#!/bin/bash

## Compile OpenSSL
OPENSSL=openssl-1.1.1h.tar.gz

DONE=openssl-compile-done

if [ ! -f "${DONE}" ] ;then
    wget https://www.openssl.org/source/${OPENSSL}

    tar zxvf ${OPENSSL}

    cd $(basename $OPENSSL .tar.gz)

    ./config shared no-idea no-md2 no-mdc2 no-rc5 no-rc4 --prefix=/usr/local/

    make

    sudo make install

    cd ..

    touch ${DONE}
fi

export LD_LIBRARY_PATH=$LD_LIBRARY_PATH:/usr/local/lib64/

read -n1 -r -p "$(/usr/local/bin/openssl version) - Press any key to continue..." key

source ./nginx-with-tls13-compile.sh
Reemplazar "OPENSSL=openssl-1.1.1h.tar.gz” con la versión que desea instalar y volver a compilar con NGINX.
11. Haga que el script sea ejecutable:
chmod +x openssl-1.1-compile.sh12. Ejecute el comando:
./openssl-1.1-compile.shEspere a que se complete el proceso de recompilación OpenSSL & NGINX.
Si podemos ayudarlo o hay adiciones que hacer, la sección de comentarios está abierta.